
Sphinxでweb制作
Pythonのインストール
Windows 10(64bit)に3系をインストールする時の手順。
Python: https://www.python.org/
Downloads タブから Dowmnload Python 3.x.x を選び、自分のPC環境に合ったものを落とす。インストーラ付きのものが便利。
インストールを実行するときに Add Python 3.5 to PATH にチェックを入れるとpathを自力で通さなくていいので便利…まじ便利…
古いヴァージョンからの書き換え
僕は以前2.7を使っていたのでpathを書き換える必要があった。
参考サイト:http://bty.sakura.ne.jp/wp/archives/1422
Windowsのコントロールパネルを開き、 システムとセキュリティ → システム → システムの詳細設定 と進む。
詳細設定 のタブから 環境変数 へ行き、 システム環境変数 に以前設定したPython2.7のパスが設定されているので、これを消去する。
コマンドプロンプトを立ち上げて「python」と入力し3.x.xと出ればOK。
Sphinxのインストール
Pythonが入っていれば、Pythonのライブラリを簡単にインストールできるコマンド 「pip」 を使うことができる。
pipはPython2.7.9, Python3.4.0以降のバージョンに含まれている。
pipは自力でアップデートしないといけない。
pip install -U pip
pipの準備ができたらSphinxをインストールする。
pip install sphinx -U
最新版がインストールされる。
sphinx-build -h
Sphinxのヴァージョン確認ができる。
プロジェクト作成の準備
コマンドプロンプトからプロジェクトフォルダを作りたいディレクトリに移動する。
cd 移動したいフォルダ
と入力する。ただし、今いる階層より上に行くときは
cd ../
と入力する。
全角文字のフォルダに移動したいときは「CTRL+半/全」で全角文字の入力が可能。
mkdir フォルダ名
で新しいフォルダができる。「フォルダ名」は任意の名前で。
当然ながら半角のみ、単語と単語の間にスペースは置けない。「book diary」は「book_diary」などとする。
mkdir book_diary
CD book_diary
sphinx-quickstart
任意のフォルダの中で
sphinx-quickstart
と入力する。Sphinxの設定が作られるので、質問に答えて完了させる。回答結果でconf.pyが生成される。ここで間違えて答えても、あとからconf.pyを書き換えることでやり直せる。
以下、その問いと答え。
Please enter values for the following settings
(just press Enter to accept a default value,
if one is given in brackets).

Enter the root path for documentation.
> Root path for the documentation [.]:
ルートパスの設定。特に変更なし。
You have two options for placing the build directory for Sphinx output.
Either, you use a directory "_build"
within the root path, or you separate "source" and "build" directories within the root path.
> Separate source and build directories (y/n) [n]:
ソースのフォルダとビルドしたフォルダを分けるかどうか。デフォルトでは分けないことになっている。
Inside the root directory, two more directories will be created; "_templates"
for custom HTML templates and "_static" for custom stylesheets and other static
files. You can enter another prefix (such as ".") to replace the underscore.
> Name prefix for templates and static dir [_]:
ディレクトリの名前の先頭につく接頭辞。デフォルトでは'_'。
The project name will occur in several places in the built documentation.
> Project name:
プロジェクト名を決る。必須。サンプルサイトは読書日記なので、「Book Diary」と答える。
>Author name(s):
ドキュメントの著者名。これも必須。2byte文字はダメだった気がする。
Sphinx has the notion of a "version" and a "release" for the
software. Each version can have multiple releases. For example, for
Python the version is something like 2.5 or 3.0, while the release is
something like 2.5.1 or 3.0a1.  If you don't need this dual structure,
just set both to the same value.
> Project version:
> Project release :
project versionは「1.0」や「2015.9.10」など、好きな番号で良い。
project releaseはデフォルトだと上と同じものが入る。これも必須です。「1.0」と入力しました。
なお、必須なのは 「プロジェクト名」 , 「著者名」 , 「バージョン番号」 のみ。
If the documents are to be written in a language other than English,
you can select a language here by its language code. Sphinx will then
translate text that it generates into that language.

For a list of supported codes, see
http://sphinx-doc.org/config.html#confval-language.
> Project language [en]:
言語を選ぶ。デフォルトでは「en」。
「en」だと生成されたサイトのサイドバーやフッタテキストが英語表記になり、サイト内検索で日本語の検索が不可能になる。
日本語が使いたい場合は「ja」と書き換える。
The file name suffix for source files. Commonly, this is either ".txt"
or ".rst".  Only files with this suffix are considered documents.
> Source file suffix [.rst]:
ソースの形式を決める。デフォルトでは「.rst」となっている。
One document is special in that it is considered the top node of the
"contents tree", that is, it is the root of the hierarchical structure
of the documents. Normally, this is "index", but if your "index"
document is a custom template, you can also set this to another filename.
> Name of your master document (without suffix) [index]:
目次となるファイルの名前。デフォルトでは「index」となっている。 自分のサイト設計に合わせて「index_2」や「BlogIndex」のように自由に設定することもできる。
Sphinx can also add configuration for epub output:
> Do you want to use the epub builder (y/n) [n]:
ePubの設定をするかどうか。ここで「y」にしても自分でオプションの追加をする必要がある。
参考サイト:http://sphinx-users.jp/cookbook/epub/
Please indicate if you want to use one of the following Sphinx extensions:
> autodoc: automatically insert docstrings from modules (y/n) [n]:
> doctest: automatically test code snippets in doctest blocks (y/n) [n]:
> intersphinx: link between Sphinx documentation of different projects (y/n) [n]:
> todo: write "todo" entries that can be shown or hidden on build (y/n) [n]:
> coverage: checks for documentation coverage (y/n) [n]:
> pngmath: include math, rendered as PNG images (y/n) [n]:
> mathjax: include math, rendered in the browser by MathJax (y/n) [n]:
> ifconfig: conditional inclusion of content based on config values (y/n) [n]:
> viewcode: include links to the source code of documented Python objects (y/n) [n]:
それぞれ拡張機能を追加するかどうかを尋ねている。
A Makefile and a Windows command file can be generated for you so that you
only have to run e.g. `make html' instead of invoking sphinx-build
directly.
> Create Makefile? (y/n) [y]:
> Create Windows command file? (y/n) [y]: y
ビルド用の「メイクファイル」と「バッチファイル」を作るかどうか、ウィンドウズ用のコマンドを使うかどうか。デフォルトで「y」となっている。
以上で質問は終わる。
Creating file .\conf.py.
Creating file .\index.rst.
Creating file .\Makefile.
Creating file .\make.bat.

Finished: An initial directory structure has been created.

You should now populate your master file .\index.rst and create other documentation
source files. Use the Makefile to build the docs, like so:
   make builder
where "builder" is one of the supported builders, e.g. html, latex or linkcheck.
生成されたフォルダを開くと以下のフォルダ・ファイルが格納されている。
| 名前 | 概要 |
|---|---|
| _build | 生成したhtmlファイルなどが格納される場所。 |
| _static | 画像などを格納する。 |
| _templates | 自作のテンプレートを格納する。 |
| conf.py | Pythonで記述された設定ファイル。後から編集できる。 |
| index.rst | reStructuedTextで記述されたソースファイル。後から編集できる。 |
| make.bat | windowsの命令が書かれたバッチファイル。 |
| Makefile | コンパイラ用のファイル。 |
make html
コマンドプロンプトから
make html
と命令すると、「index.rst」のファイルからhtmlファイルを自動的に生成する。
「_build」フォルダの中に「html」というフォルダができているので、中に「index.html」があることを確認する。ブラウザで開くと環境にもよるが
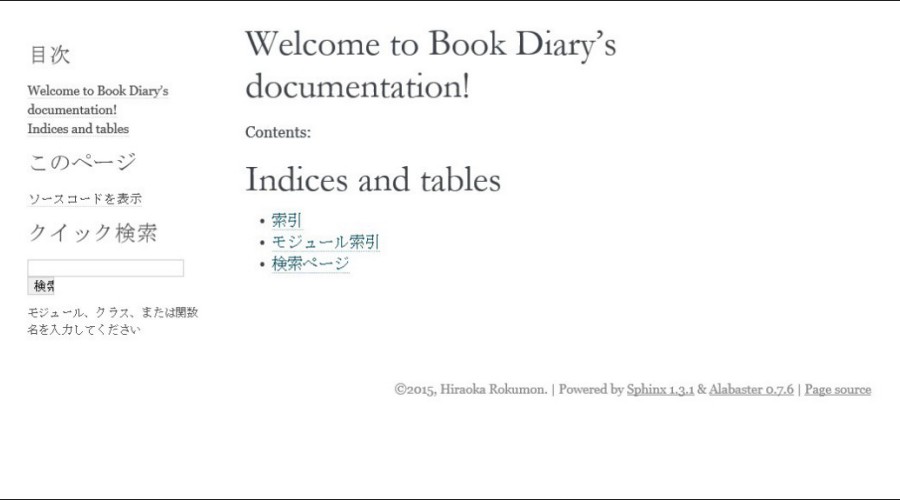
このような画面になる。
デフォルトのテーマは「alabaster」となっている。
themeを変更する
テーマやタイトルなどの変更、プラグインの追加などは「conf.py」を書き換えることで可能となっている。
Sphinxでは最初からインストールされている組み込みテーマがいくつかある。それらはconf.pyの記述を書き換えるだけで着せ替えられる。テーマによってはオプションでカラーやフォントを変えることができる。サードパーティ製のものや自作したものも自由に追加できる。
参考サイト: http://docs.sphinx-users.jp/theming.html
今回は組み込みテーマを簡単なオプション追加でカスタマイズするのみとする。
「conf.py」をテキストエディタで開く。エディタはUTF-8, BOM無しをサポートしているものを使う。
「html_theme」の記述を探す。
# The theme to use for HTML and HTML Help pages.  See the documentation for
# a list of builtin themes.
html_theme = 'alabaster'
となっている、'alabaster'の箇所を書き換える。書き換えるたびにmake htmlを実行してみる。
今回は「classic」を適応した。

html_theme_optionの変更
classicにはいくつか変更できる箇所がある。
参考サイト: http://docs.sphinx-users.jp/theming.html
html_theme_options = {
      'nosidebar'          : '', #サイドバーの有無。デフォルトでは'True'
      'rightsidebar'       ; '', #サイドバーを右に移動する。デフォルトでは'False'
      'stickysidebar'      ; '', #サイドバーを画面上に固定する。デフォルトは'False'
      'collapsiblesidebar' ; '', #サイドバーを折りたたむ実験的な JavaScriptを追加する。”stickysidebar”と一緒には動作しない。 デフォルトは'False'
      'externalrefs'       ; '', #外部リンクと内部リンクを異なる表示にする。デフォルトは'False'
      'sidebarwidth'    : '', #サイドバーの幅。ピクセル単位を含まないで記述。デフォルトかつ最大は'230'
      'footerbgcolor'   : '', #フッタ背景色
      'footertextcolor' : '', #フッタテキスト
      'sidebarbgcolor'  : '', #サイドバー背景色
      'sidebartextcolor': '', #サイドバーテキスト
      'sidebarlinkcolor': '', #サイドバーリンク
      'relbarbgcolor'   : '', #上下バーの背景
      'relbartextcolor' : '', #上下バーのテキスト
      'relbarlinkcolor' : '', #上下バーのリンク
      'bgcolor'         : '', #コンテンツの背景
      'textcolor'       : '', #コンテンツのテキスト
      'linkcolor'       : '', #コンテンツのリンクカラー
      'visitedlinkcolor': '', #訪れたリンク
      'headbgcolor'     : '', #タイトルバーの背景
      'headtextcolor'   : '', #タイトルバーのテキスト
      'headlinkcolor'   : '', #タイトルバーのリンク
      'codebgcolor'     : '', #コードブロックの背景色
      'codetextcolor'   : '', #ハイライトスタイルを設定していない場合に使用される、コードブロックのデフォルトのテキストカラー
      'bodyfont'        : '', #CSSフォントファミリーを記入。通常のテキストのためのフォント
      'headfont'        : '', #CSSフォントファミリーを記入。見出しのためのフォント。
ヒント
すべての項目を設定する必要はない。不要なものは文頭に # をつけてコメントアウト化しておくか、そもそも記述しない。
デザイン一例
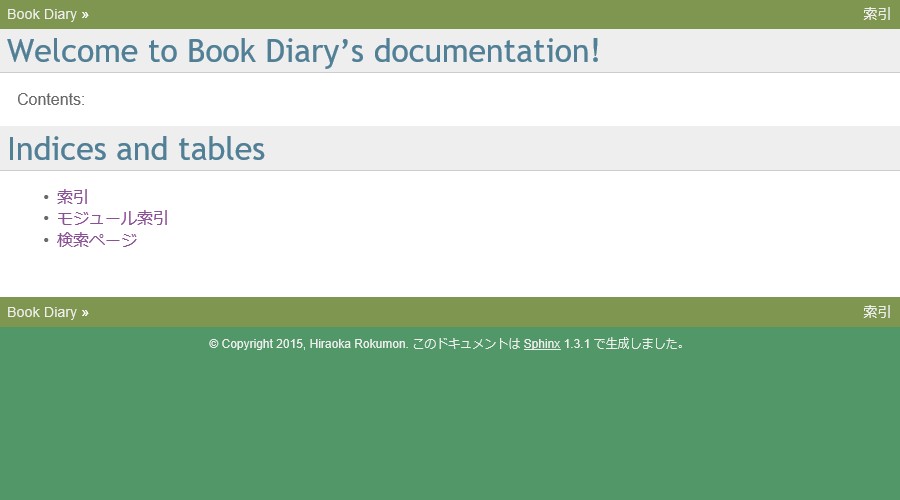
nosidebar を適応した例
そのほかにもconf.pyでは様々なことが設定できる。